Hey there! As a supplier of Magnetic Net for Door, I'm super excited to walk you through the installation process of these nifty magnetic nets. They're a game - changer when it comes to keeping bugs out while still allowing fresh air to flow in.

Getting Ready for Installation
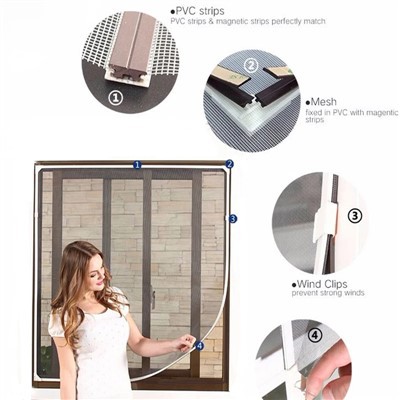
First things first, you gotta gather all the tools and materials you'll need. You'll typically find that most Magnetic Net for Door kits come with the net itself, a set of magnets, adhesive strips, and sometimes a few extra bits like corner protectors. In addition to what's in the kit, you'll want to have a good pair of scissors, a measuring tape, and a level handy.
Before you start the actual installation, it's crucial to measure your door opening accurately. You don't want a net that's too small or too big. Use your measuring tape to get the width and height of the door frame. Make sure to measure at multiple points, especially if your door isn't perfectly square. Write down these measurements and double - check them. This step is super important because a well - fitting net not only looks better but also works more effectively.
Preparing the Door Frame
Once you've got your measurements sorted, it's time to prep the door frame. Clean the surface where you'll be attaching the magnetic net. Use a mild detergent and a cloth to wipe away any dust, dirt, or grease. This ensures that the adhesive strips on the net will stick properly. If there are any rough spots or bumps on the frame, sand them down gently so that the net can lie flat.
Installing the Top Track
Most Magnetic Net for Door systems come with a top track. Start by positioning the top track on the top of the door frame. Use your level to make sure it's perfectly horizontal. Once it's in the right place, mark the spots where you'll be attaching it. You can use the pre - drilled holes in the track as a guide.
If your track comes with adhesive strips, simply peel off the backing and stick it to the door frame. Press firmly along the entire length to ensure a good bond. If it requires screws, drill pilot holes at the marked spots and then screw the track into place. Make sure the screws are tight but don't overtighten them, as this could damage the frame.
Attaching the Side Tracks
After the top track is secure, it's time to install the side tracks. Measure the length of the side tracks to fit the height of your door frame. You can use your scissors to cut them to the right size if needed. Just like with the top track, use the level to make sure the side tracks are perfectly vertical.
Attach the side tracks to the door frame using either adhesive strips or screws, depending on the type of track you have. Start from the top and work your way down, making sure the track is straight and firmly attached. The side tracks are important because they hold the magnetic net in place and help it slide smoothly.
Mounting the Magnetic Net
Now comes the fun part - mounting the magnetic net. Unroll the net and attach it to the top track. Most nets have a simple clip - on or slide - in mechanism. Align the top edge of the net with the track and secure it according to the instructions.
Next, attach the sides of the net to the side tracks. Make sure the net is evenly spread out and there are no wrinkles or folds. The magnetic strips on the sides of the net should line up with the magnets in the side tracks. When you're done, give the net a gentle tug to make sure it's securely attached.
Adjusting the Magnets
Once the net is mounted, it's time to adjust the magnets. The magnets are what make the net close automatically when you walk through the door. Check that the magnets on the two sides of the net are attracting each other properly. If the magnets seem too weak or too strong, you can usually adjust them by moving them slightly along the track.
A good way to test the magnets is to open the net and let it close on its own. It should close smoothly and tightly, leaving no gaps for bugs to get through. If there are any areas where the magnets aren't aligning correctly, you can use a small tool to nudge them into place.
Finishing Touches
After you've got the net installed and the magnets adjusted, take a step back and check the overall look. Make sure the net is hanging straight and there are no loose ends. Trim any excess netting using your scissors, but be careful not to cut too close to the magnets or the tracks.
You can also add any additional accessories that came with your Magnetic Net for Door, like corner protectors. These not only add a finishing touch but also help protect the net and the door frame from damage.
Why Choose Our Magnetic Net for Door
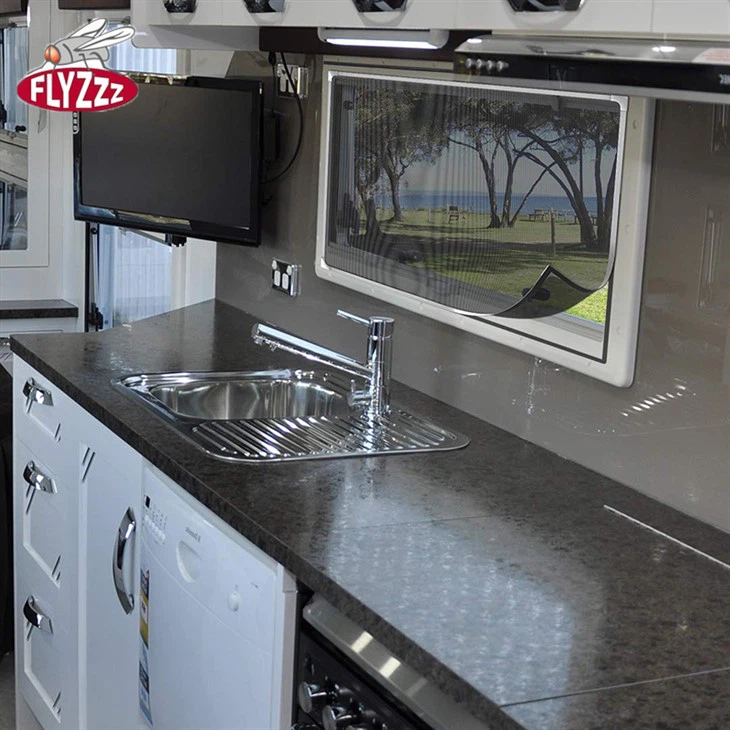
As a supplier, I can tell you that our Magnetic Net for Door is top - notch. It's made from high - quality materials that are durable and long - lasting. The magnetic system is strong and reliable, ensuring that your door stays bug - free. Plus, it's easy to install, as you've just seen from the steps above.
If you're also interested in other magnetic screen products, check out our Magnetic Insect Screen Window and Magnetic Mesh Screen Door. These products offer similar benefits and can be a great addition to your home.
Contact Us for Purchase
If you're thinking about getting a Magnetic Net for Door for your home or business, we'd love to hear from you. We offer a wide range of sizes and styles to fit your needs. Whether you're a homeowner looking for a simple solution or a contractor working on a big project, we've got you covered. Reach out to us to start the purchasing process and get your hands on this amazing product.
References
- General knowledge from years of experience in the magnetic screen industry.
- Manufacturer's installation guides for Magnetic Net for Door products.